Python 与 NumPy 教程(含 Jupyter 和 Colab)

本教程最初由 Justin Johnson 贡献。
我们将使用 Python 编程语言完代价课程的所有作业。 Python 本身就是一种出色的通用编程语言,但随着 在一些流行的库(numpy、scipy、matplotlib)的帮助下,它成为一个强大的 科学计算环境。
我们希望你们中的许多人都会有一些 Python 和 numpy 的经验; 对于其他人来说,本节将作为关于这两个方面的快速速成课程 Python 编程语言及其在科学领域的应用 计算。我们还会介绍笔记本,这是一种非常方便的方式 修补 Python 代码。你们中的一些人可能有过相关知识 不同的语言,在这种情况下我们还建议参考: 面向 Matlab 用户的 NumPy, 适用于 R 用户的 Python,和/或 适用于 SAS 用户的 Python。
本篇目录
- Jupyter 与 Colab 笔记本
- Python
- Python 版本
- 基本数据类型
- 容器
- 函数
- 类
- NumPy
- 数组
- 数组索引
- 数据类型
- 数组运算
- 广播机制
- NumPy 文档
- SciPy
- 图像操作
- MATLAB 文件
- 点之间的距离
- Matplotlib
- 绘图
- 子图
- 图像显示
Jupyter 与 Colab 笔记本
开始学习 Python 之前,先简单介绍笔记本(notebook)。Jupyter 笔记本让你通过浏览器编写并在本机执行 Python 代码,便于修改代码、分段运行,因此广泛用于科学计算。Colab 则是 Google 提供的 Jupyter 笔记本环境,适合机器学习和数据分析,代码完全在云端运行。可以把它看作功能更丰富的 Jupyter:免费、无需配置、预装大量软件包、易于分享,而且可以使用免费的 GPU、TPU 等硬件加速器,但有一定限制。
在 Colab 中运行教程(推荐)。如果希望完全在 Colab 中完成教程,请点击本页顶部的 Open in Colab 徽标。
在 Jupyter Notebook 中运行教程。如果希望在本机运行,请先按照环境配置说明正确安装并激活虚拟环境,再执行 pip install notebook 安装 Jupyter Notebook。接着打开笔记本,在页面上点击鼠标右键并选择 Save Page As,将其下载到所选目录。使用 cd 进入该目录,再执行 jupyter notebook。
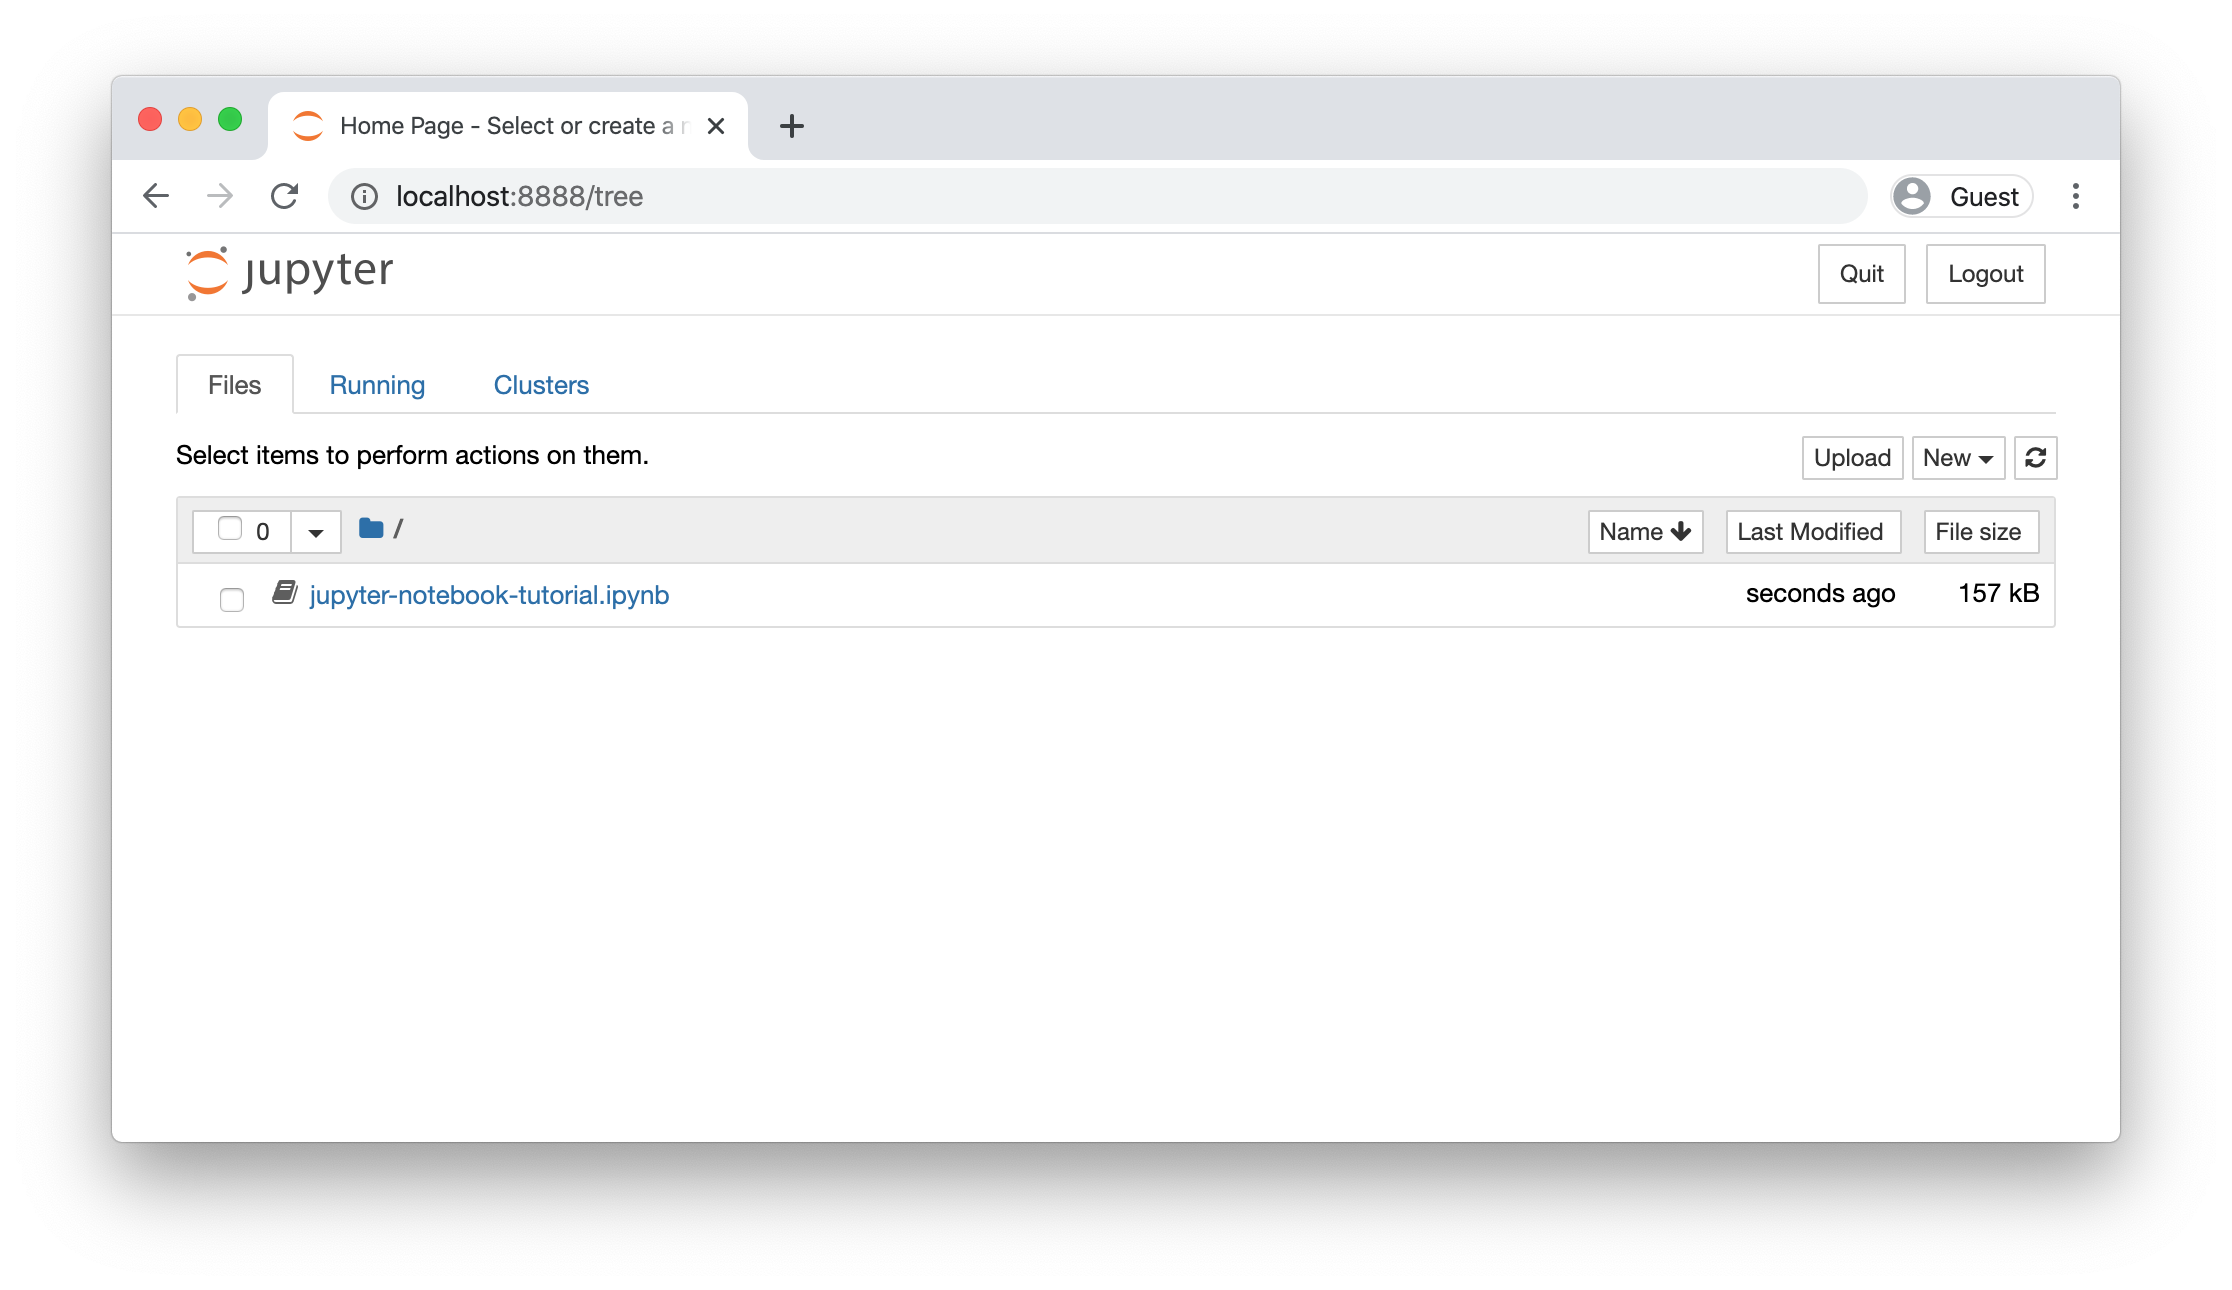
这应当会自动在 http://localhost:8888 启动笔记本服务。若一切正常,你会看到如下界面,列出当前目录中的全部笔记本。点击 jupyter-notebook-tutorial.ipynb 并按其中的说明操作;也可以继续阅读下面包含代码片段的教程。
Python
Python 是一种高级、动态类型、支持多种编程范式的语言。人们常说 Python 代码接近伪代码,因为只需很少的代码行就能表达丰富的逻辑,同时具有良好的可读性。例如,下面用 Python 实现经典的快速排序算法:
def quicksort(arr):
    if len(arr) <= 1:
        return arr
    pivot = arr[len(arr) // 2]
    left = [x for x in arr if x < pivot]
    middle = [x for x in arr if x == pivot]
    right = [x for x in arr if x > pivot]
    return quicksort(left) + middle + quicksort(right)

print(quicksort([3,6,8,10,1,2,1]))
# Prints "[1, 1, 2, 3, 6, 8, 10]"
Python 版本
自 2020 年 1 月 1 日起,Python 已正式停止支持 python2。本课程的代码统一使用 Python 3.7。继续本教程前,请按照环境配置说明正确安装 python3 虚拟环境。激活环境后,可在命令行运行 python --version 再次确认 Python 版本。
基本数据类型
与大多数语言一样,Python 提供整数、浮点数、布尔值和字符串等基本类型,其行为与其他编程语言中对应类型的行为相近。
数值:整数和浮点数的用法与其他语言类似:
x = 3
print(type(x)) # Prints "<class 'int'>"
print(x)       # Prints "3"
print(x + 1)   # Addition; prints "4"
print(x - 1)   # Subtraction; prints "2"
print(x * 2)   # Multiplication; prints "6"
print(x ** 2)  # Exponentiation; prints "9"
x += 1
print(x)  # Prints "4"
x *= 2
print(x)  # Prints "8"
y = 2.5
print(type(y)) # Prints "<class 'float'>"
print(y, y + 1, y * 2, y ** 2) # Prints "2.5 3.5 5.0 6.25"
注意,与许多语言不同,Python 没有一元自增(x++)或自减(x--)运算符。
Python 还内置了复数类型,详细用法见官方文档。
布尔值:Python 支持常见的布尔逻辑运算,但使用英文单词而非符号作为运算符,例如 &&、|| 等:
t = True
f = False
print(type(t)) # Prints "<class 'bool'>"
print(t and f) # Logical AND; prints "False"
print(t or f)  # Logical OR; prints "True"
print(not t)   # Logical NOT; prints "False"
print(t != f)  # Logical XOR; prints "True"
字符串:Python 对字符串提供了丰富的支持:
hello = 'hello'    # String literals can use single quotes
world = "world"    # or double quotes; it does not matter.
print(hello)       # Prints "hello"
print(len(hello))  # String length; prints "5"
hw = hello + ' ' + world  # String concatenation
print(hw)  # prints "hello world"
hw12 = '%s %s %d' % (hello, world, 12)  # sprintf style string formatting
print(hw12)  # prints "hello world 12"
字符串对象提供了许多实用方法,例如:
s = "hello"
print(s.capitalize())  # Capitalize a string; prints "Hello"
print(s.upper())       # Convert a string to uppercase; prints "HELLO"
print(s.rjust(7))      # Right-justify a string, padding with spaces; prints "  hello"
print(s.center(7))     # Center a string, padding with spaces; prints " hello "
print(s.replace('l', '(ell)'))  # Replace all instances of one substring with another;
                                # prints "he(ell)(ell)o"
print('  world '.strip())  # Strip leading and trailing whitespace; prints "world"
完整的字符串方法列表见官方文档。
容器
Python 内置了多种容器类型,包括列表、字典、集合和元组。
列表
列表类似于其他语言中的数组,但长度可以变化,也可以同时存放不同类型的元素:
xs = [3, 1, 2]    # Create a list
print(xs, xs[2])  # Prints "[3, 1, 2] 2"
print(xs[-1])     # Negative indices count from the end of the list; prints "2"
xs[2] = 'foo'     # Lists can contain elements of different types
print(xs)         # Prints "[3, 1, 'foo']"
xs.append('bar')  # Add a new element to the end of the list
print(xs)         # Prints "[3, 1, 'foo', 'bar']"
x = xs.pop()      # Remove and return the last element of the list
print(x, xs)      # Prints "bar [3, 1, 'foo']"
列表的完整说明见官方文档。
切片:除了逐个访问列表元素,Python 还提供了简洁的语法来获取子列表,这称为切片:
nums = list(range(5))     # range is a built-in function that creates a list of integers
print(nums)               # Prints "[0, 1, 2, 3, 4]"
print(nums[2:4])          # Get a slice from index 2 to 4 (exclusive); prints "[2, 3]"
print(nums[2:])           # Get a slice from index 2 to the end; prints "[2, 3, 4]"
print(nums[:2])           # Get a slice from the start to index 2 (exclusive); prints "[0, 1]"
print(nums[:])            # Get a slice of the whole list; prints "[0, 1, 2, 3, 4]"
print(nums[:-1])          # Slice indices can be negative; prints "[0, 1, 2, 3]"
nums[2:4] = [8, 9]        # Assign a new sublist to a slice
print(nums)               # Prints "[0, 1, 8, 9, 4]"
介绍 NumPy 数组时,还会再次用到切片。
循环:可以这样遍历列表中的元素:
animals = ['cat', 'dog', 'monkey']
for animal in animals:
    print(animal)
# Prints "cat", "dog", "monkey", each on its own line.
如果循环中还需要知道每个元素的索引,可以使用内置的 enumerate 函数:
animals = ['cat', 'dog', 'monkey']
for idx, animal in enumerate(animals):
    print('#%d: %s' % (idx + 1, animal))
# Prints "#1: cat", "#2: dog", "#3: monkey", each on its own line
列表推导式:编程时经常需要将一组数据变换为另一组数据。例如,下面的代码计算各个数的平方:
nums = [0, 1, 2, 3, 4]
squares = []
for x in nums:
    squares.append(x ** 2)
print(squares)   # Prints [0, 1, 4, 9, 16]
使用列表推导式可以让代码更简洁:
nums = [0, 1, 2, 3, 4]
squares = [x ** 2 for x in nums]
print(squares)   # Prints [0, 1, 4, 9, 16]
列表推导式中也可以加入条件:
nums = [0, 1, 2, 3, 4]
even_squares = [x ** 2 for x in nums if x % 2 == 0]
print(even_squares)  # Prints "[0, 4, 16]"
字典
字典存储“键—值”对,类似于 Java 中的 Map 或 JavaScript 中的对象。用法如下:
d = {'cat': 'cute', 'dog': 'furry'}  # Create a new dictionary with some data
print(d['cat'])       # Get an entry from a dictionary; prints "cute"
print('cat' in d)     # Check if a dictionary has a given key; prints "True"
d['fish'] = 'wet'     # Set an entry in a dictionary
print(d['fish'])      # Prints "wet"
# print(d['monkey'])  # KeyError: 'monkey' not a key of d
print(d.get('monkey', 'N/A'))  # Get an element with a default; prints "N/A"
print(d.get('fish', 'N/A'))    # Get an element with a default; prints "wet"
del d['fish']         # Remove an element from a dictionary
print(d.get('fish', 'N/A')) # "fish" is no longer a key; prints "N/A"
字典的详细说明见官方文档。
循环:遍历字典中的键很简单:
d = {'person': 2, 'cat': 4, 'spider': 8}
for animal in d:
    legs = d[animal]
    print('A %s has %d legs' % (animal, legs))
# Prints "A person has 2 legs", "A cat has 4 legs", "A spider has 8 legs"
如果需要同时访问键及其对应的值,可以使用 items 方法:
d = {'person': 2, 'cat': 4, 'spider': 8}
for animal, legs in d.items():
    print('A %s has %d legs' % (animal, legs))
# Prints "A person has 2 legs", "A cat has 4 legs", "A spider has 8 legs"
字典推导式:它与列表推导式类似,可以方便地构造字典。例如:
nums = [0, 1, 2, 3, 4]
even_num_to_square = {x: x ** 2 for x in nums if x % 2 == 0}
print(even_num_to_square)  # Prints "{0: 0, 2: 4, 4: 16}"
集合
集合由互不重复的元素构成,而且不保证元素顺序。下面是一个简单示例:
animals = {'cat', 'dog'}
print('cat' in animals)   # Check if an element is in a set; prints "True"
print('fish' in animals)  # prints "False"
animals.add('fish')       # Add an element to a set
print('fish' in animals)  # Prints "True"
print(len(animals))       # Number of elements in a set; prints "3"
animals.add('cat')        # Adding an element that is already in the set does nothing
print(len(animals))       # Prints "3"
animals.remove('cat')     # Remove an element from a set
print(len(animals))       # Prints "2"
集合的详细说明见官方文档。
循环:遍历集合与遍历列表的语法相同。但集合是无序的,因此不能假定元素会按某种固定顺序被访问:
animals = {'cat', 'dog', 'fish'}
for idx, animal in enumerate(animals):
    print('#%d: %s' % (idx + 1, animal))
# Prints "#1: fish", "#2: dog", "#3: cat"
集合推导式:与列表、字典类似,也可以用集合推导式方便地构造集合:
from math import sqrt
nums = {int(sqrt(x)) for x in range(30)}
print(nums)  # Prints "{0, 1, 2, 3, 4, 5}"
元组
元组是一组不可变的有序值,在许多方面与列表相似。一个重要区别是:元组可以用作字典的键或集合的元素,而列表不可以。下面是一个简单示例:
d = {(x, x + 1): x for x in range(10)}  # Create a dictionary with tuple keys
t = (5, 6)        # Create a tuple
print(type(t))    # Prints "<class 'tuple'>"
print(d[t])       # Prints "5"
print(d[(1, 2)])  # Prints "1"
元组的更多说明见官方文档。
函数
Python 使用 def 关键字定义函数,例如:
def sign(x):
    if x > 0:
        return 'positive'
    elif x < 0:
        return 'negative'
    else:
        return 'zero'

for x in [-1, 0, 1]:
    print(sign(x))
# Prints "negative", "zero", "positive"
我们也经常为函数定义可选的关键字参数,例如:
def hello(name, loud=False):
    if loud:
        print('HELLO, %s!' % name.upper())
    else:
        print('Hello, %s' % name)

hello('Bob') # Prints "Hello, Bob"
hello('Fred', loud=True)  # Prints "HELLO, FRED!"
Python 函数的更多用法见官方文档。
类
Python 中定义类的语法很直观:
class Greeter(object):

    # Constructor
    def __init__(self, name):
        self.name = name  # Create an instance variable

    # Instance method
    def greet(self, loud=False):
        if loud:
            print('HELLO, %s!' % self.name.upper())
        else:
            print('Hello, %s' % self.name)

g = Greeter('Fred')  # Construct an instance of the Greeter class
g.greet()            # Call an instance method; prints "Hello, Fred"
g.greet(loud=True)   # Call an instance method; prints "HELLO, FRED!"
Python 类的更多用法见官方文档。
NumPy
NumPy 是 Python 科学计算的核心库,提供高性能的多维数组对象及相应的处理工具。如果你熟悉 MATLAB,可以参考这篇教程来入门 NumPy。
数组
NumPy 数组是一组按多维网格排列、类型相同的数值,可用非负整数构成的元组进行索引。数组拥有多少个轴,就称其具有多少个维度(原文称 rank);数组的形状(shape)则是一个整数元组,给出每个维度的大小。
可以用嵌套的 Python 列表初始化 NumPy 数组,并通过方括号访问元素:
import numpy as np

a = np.array([1, 2, 3])   # Create a rank 1 array
print(type(a))            # Prints "<class 'numpy.ndarray'>"
print(a.shape)            # Prints "(3,)"
print(a[0], a[1], a[2])   # Prints "1 2 3"
a[0] = 5                  # Change an element of the array
print(a)                  # Prints "[5, 2, 3]"

b = np.array([[1,2,3],[4,5,6]])    # Create a rank 2 array
print(b.shape)                     # Prints "(2, 3)"
print(b[0, 0], b[0, 1], b[1, 0])   # Prints "1 2 4"
NumPy 还提供了许多创建数组的函数:
import numpy as np

a = np.zeros((2,2))   # Create an array of all zeros
print(a)              # Prints "[[ 0.  0.]
                      #          [ 0.  0.]]"

b = np.ones((1,2))    # Create an array of all ones
print(b)              # Prints "[[ 1.  1.]]"

c = np.full((2,2), 7)  # Create a constant array
print(c)               # Prints "[[ 7.  7.]
                       #          [ 7.  7.]]"

d = np.eye(2)         # Create a 2x2 identity matrix
print(d)              # Prints "[[ 1.  0.]
                      #          [ 0.  1.]]"

e = np.random.random((2,2))  # Create an array filled with random values
print(e)                     # Might print "[[ 0.91940167  0.08143941]
                             #               [ 0.68744134  0.87236687]]"
其他创建数组的方法见官方文档。
数组索引
NumPy 提供了多种数组索引方式。
切片:与 Python 列表类似,NumPy 数组也支持切片。数组可能有多个维度,因此需要分别指定各个维度上的切片:
import numpy as np

# Create the following rank 2 array with shape (3, 4)
# [[ 1  2  3  4]
#  [ 5  6  7  8]
#  [ 9 10 11 12]]
a = np.array([[1,2,3,4], [5,6,7,8], [9,10,11,12]])

# Use slicing to pull out the subarray consisting of the first 2 rows
# and columns 1 and 2; b is the following array of shape (2, 2):
# [[2 3]
#  [6 7]]
b = a[:2, 1:3]

# A slice of an array is a view into the same data, so modifying it
# will modify the original array.
print(a[0, 1])   # Prints "2"
b[0, 0] = 77     # b[0, 0] is the same piece of data as a[0, 1]
print(a[0, 1])   # Prints "77"
整数索引与切片索引可以混合使用,不过得到的数组维数会低于原数组。注意,这与 MATLAB 处理数组切片的方式有明显区别:
import numpy as np

# Create the following rank 2 array with shape (3, 4)
# [[ 1  2  3  4]
#  [ 5  6  7  8]
#  [ 9 10 11 12]]
a = np.array([[1,2,3,4], [5,6,7,8], [9,10,11,12]])

# Two ways of accessing the data in the middle row of the array.
# Mixing integer indexing with slices yields an array of lower rank,
# while using only slices yields an array of the same rank as the
# original array:
row_r1 = a[1, :]    # Rank 1 view of the second row of a
row_r2 = a[1:2, :]  # Rank 2 view of the second row of a
print(row_r1, row_r1.shape)  # Prints "[5 6 7 8] (4,)"
print(row_r2, row_r2.shape)  # Prints "[[5 6 7 8]] (1, 4)"

# We can make the same distinction when accessing columns of an array:
col_r1 = a[:, 1]
col_r2 = a[:, 1:2]
print(col_r1, col_r1.shape)  # Prints "[ 2  6 10] (3,)"
print(col_r2, col_r2.shape)  # Prints "[[ 2]
                             #          [ 6]
                             #          [10]] (3, 1)"
整数数组索引:使用切片索引 NumPy 数组时,得到的是原数组某个子数组的视图。整数数组索引则允许从原数组中任意选择元素,构成新的数组。例如:
import numpy as np

a = np.array([[1,2], [3, 4], [5, 6]])

# An example of integer array indexing.
# The returned array will have shape (3,) and
print(a[[0, 1, 2], [0, 1, 0]])  # Prints "[1 4 5]"

# The above example of integer array indexing is equivalent to this:
print(np.array([a[0, 0], a[1, 1], a[2, 0]]))  # Prints "[1 4 5]"

# When using integer array indexing, you can reuse the same
# element from the source array:
print(a[[0, 0], [1, 1]])  # Prints "[2 2]"

# Equivalent to the previous integer array indexing example
print(np.array([a[0, 1], a[0, 1]]))  # Prints "[2 2]"
整数数组索引的一个实用技巧,是从矩阵每一行中各选择或修改一个元素:
import numpy as np

# Create a new array from which we will select elements
a = np.array([[1,2,3], [4,5,6], [7,8,9], [10, 11, 12]])

print(a)  # prints "array([[ 1,  2,  3],
          #                [ 4,  5,  6],
          #                [ 7,  8,  9],
          #                [10, 11, 12]])"

# Create an array of indices
b = np.array([0, 2, 0, 1])

# Select one element from each row of a using the indices in b
print(a[np.arange(4), b])  # Prints "[ 1  6  7 11]"

# Mutate one element from each row of a using the indices in b
a[np.arange(4), b] += 10

print(a)  # prints "array([[11,  2,  3],
          #                [ 4,  5, 16],
          #                [17,  8,  9],
          #                [10, 21, 12]])
布尔数组索引:布尔数组索引可以按条件选取数组中的任意元素,通常用于筛选满足某个条件的元素。例如:
import numpy as np

a = np.array([[1,2], [3, 4], [5, 6]])

bool_idx = (a > 2)   # Find the elements of a that are bigger than 2;
                     # this returns a numpy array of Booleans of the same
                     # shape as a, where each slot of bool_idx tells
                     # whether that element of a is > 2.

print(bool_idx)      # Prints "[[False False]
                     #          [ True  True]
                     #          [ True  True]]"

# We use boolean array indexing to construct a rank 1 array
# consisting of the elements of a corresponding to the True values
# of bool_idx
print(a[bool_idx])  # Prints "[3 4 5 6]"

# We can do all of the above in a single concise statement:
print(a[a > 2])     # Prints "[3 4 5 6]"
为简洁起见,这里省略了数组索引的许多细节。需要进一步了解时,请查阅官方文档。
数据类型
每个 NumPy 数组中的元素具有相同类型。NumPy 提供了多种数值数据类型供创建数组时使用。创建数组时,NumPy 会尝试推断元素类型;通常也可以通过构造函数的可选参数显式指定类型。例如:
import numpy as np

x = np.array([1, 2])   # Let numpy choose the datatype
print(x.dtype)         # Prints "int64"

x = np.array([1.0, 2.0])   # Let numpy choose the datatype
print(x.dtype)             # Prints "float64"

x = np.array([1, 2], dtype=np.int64)   # Force a particular datatype
print(x.dtype)                         # Prints "int64"
NumPy 数据类型的详细说明见官方文档。
数组运算
基本数学运算逐元素作用于数组,既可以通过重载的运算符使用,也可以调用 NumPy 模块中的函数:
import numpy as np

x = np.array([[1,2],[3,4]], dtype=np.float64)
y = np.array([[5,6],[7,8]], dtype=np.float64)

# Elementwise sum; both produce the array
# [[ 6.0  8.0]
#  [10.0 12.0]]
print(x + y)
print(np.add(x, y))

# Elementwise difference; both produce the array
# [[-4.0 -4.0]
#  [-4.0 -4.0]]
print(x - y)
print(np.subtract(x, y))

# Elementwise product; both produce the array
# [[ 5.0 12.0]
#  [21.0 32.0]]
print(x * y)
print(np.multiply(x, y))

# Elementwise division; both produce the array
# [[ 0.2         0.33333333]
#  [ 0.42857143  0.5       ]]
print(x / y)
print(np.divide(x, y))

# Elementwise square root; produces the array
# [[ 1.          1.41421356]
#  [ 1.73205081  2.        ]]
print(np.sqrt(x))
注意,与 MATLAB 不同,* 表示逐元素乘法,而不是矩阵乘法。向量内积、矩阵与向量相乘、矩阵相乘可使用 dot。dot 既是 NumPy 模块中的函数,也是数组对象的实例方法:
import numpy as np

x = np.array([[1,2],[3,4]])
y = np.array([[5,6],[7,8]])

v = np.array([9,10])
w = np.array([11, 12])

# Inner product of vectors; both produce 219
print(v.dot(w))
print(np.dot(v, w))

# Matrix / vector product; both produce the rank 1 array [29 67]
print(x.dot(v))
print(np.dot(x, v))

# Matrix / matrix product; both produce the rank 2 array
# [[19 22]
#  [43 50]]
print(x.dot(y))
print(np.dot(x, y))
NumPy 提供了许多数组计算函数,其中一个很实用的函数是 sum:
import numpy as np

x = np.array([[1,2],[3,4]])

print(np.sum(x))  # Compute sum of all elements; prints "10"
print(np.sum(x, axis=0))  # Compute sum of each column; prints "[4 6]"
print(np.sum(x, axis=1))  # Compute sum of each row; prints "[3 7]"
NumPy 数学函数的完整列表见官方文档。
除了数学运算,我们还经常需要改变数组形状或重新组织数组中的数据。最简单的例子是矩阵转置,只需使用数组对象的 T 属性:
import numpy as np

x = np.array([[1,2], [3,4]])
print(x)    # Prints "[[1 2]
            #          [3 4]]"
print(x.T)  # Prints "[[1 3]
            #          [2 4]]"

# Note that taking the transpose of a rank 1 array does nothing:
v = np.array([1,2,3])
print(v)    # Prints "[1 2 3]"
print(v.T)  # Prints "[1 2 3]"
NumPy 还有许多数组操作函数,完整列表见官方文档。
广播机制
广播是一种强大的机制,使 NumPy 能对形状不同的数组进行算术运算。常见情形是:有一个较小数组和一个较大数组,希望重复利用较小数组对较大数组的不同部分执行同一种操作。
例如,要给矩阵的每一行加上同一个向量,可以这样实现:
import numpy as np

# We will add the vector v to each row of the matrix x,
# storing the result in the matrix y
x = np.array([[1,2,3], [4,5,6], [7,8,9], [10, 11, 12]])
v = np.array([1, 0, 1])
y = np.empty_like(x)   # Create an empty matrix with the same shape as x

# Add the vector v to each row of the matrix x with an explicit loop
for i in range(4):
    y[i, :] = x[i, :] + v

# Now y is the following
# [[ 2  2  4]
#  [ 5  5  7]
#  [ 8  8 10]
#  [11 11 13]]
print(y)
这种写法可以运行,但当矩阵 x 很大时,显式的 Python 循环可能很慢。将向量 v 加到矩阵 x 的每一行,相当于把 v 的多个副本沿竖直方向堆叠成矩阵 vv,再将 x 与 vv 逐元素相加。可以这样实现:
import numpy as np

# We will add the vector v to each row of the matrix x,
# storing the result in the matrix y
x = np.array([[1,2,3], [4,5,6], [7,8,9], [10, 11, 12]])
v = np.array([1, 0, 1])
vv = np.tile(v, (4, 1))   # Stack 4 copies of v on top of each other
print(vv)                 # Prints "[[1 0 1]
                          #          [1 0 1]
                          #          [1 0 1]
                          #          [1 0 1]]"
y = x + vv  # Add x and vv elementwise
print(y)  # Prints "[[ 2  2  4
          #          [ 5  5  7]
          #          [ 8  8 10]
          #          [11 11 13]]"
利用 NumPy 广播,不必真正创建 v 的多个副本,也能完成同样的计算:
import numpy as np

# We will add the vector v to each row of the matrix x,
# storing the result in the matrix y
x = np.array([[1,2,3], [4,5,6], [7,8,9], [10, 11, 12]])
v = np.array([1, 0, 1])
y = x + v  # Add v to each row of x using broadcasting
print(y)  # Prints "[[ 2  2  4]
          #          [ 5  5  7]
          #          [ 8  8 10]
          #          [11 11 13]]"
虽然 x 的形状是 (4, 3),而 v 的形状是 (3,),但借助广播,y = x + v 仍然能够执行。其效果就像 v 的形状实际为 (4, 3),每一行都是 v 的副本,再逐元素求和。
两个数组进行广播时遵循以下规则:
- 如果两个数组的维数不同,在维数较少的数组形状前补上若干个 1,直到两个形状元组的长度相同。
- 如果两个数组在某个维度上的大小相同,或者其中一个数组在该维度上的大小为 1,就称它们在该维度上兼容。
- 只有在所有维度上都兼容时,两个数组才能一起广播。
- 广播后,每个数组表现出的形状等于两个输入形状逐维取最大值的结果。
- 若某个维度上,一个数组的大小为 1,另一个大于 1,则前者表现得像沿该维度复制了多次一样。
支持广播的这类函数称为通用函数(ufunc)。完整列表见官方文档。
下面给出几个广播的应用示例:
import numpy as np

# Compute outer product of vectors
v = np.array([1,2,3])  # v has shape (3,)
w = np.array([4,5])    # w has shape (2,)
# To compute an outer product, we first reshape v to be a column
# vector of shape (3, 1); we can then broadcast it against w to yield
# an output of shape (3, 2), which is the outer product of v and w:
# [[ 4  5]
#  [ 8 10]
#  [12 15]]
print(np.reshape(v, (3, 1)) * w)

# Add a vector to each row of a matrix
x = np.array([[1,2,3], [4,5,6]])
# x has shape (2, 3) and v has shape (3,) so they broadcast to (2, 3),
# giving the following matrix:
# [[2 4 6]
#  [5 7 9]]
print(x + v)

# Add a vector to each column of a matrix
# x has shape (2, 3) and w has shape (2,).
# If we transpose x then it has shape (3, 2) and can be broadcast
# against w to yield a result of shape (3, 2); transposing this result
# yields the final result of shape (2, 3) which is the matrix x with
# the vector w added to each column. Gives the following matrix:
# [[ 5  6  7]
#  [ 9 10 11]]
print((x.T + w).T)
# Another solution is to reshape w to be a column vector of shape (2, 1);
# we can then broadcast it directly against x to produce the same
# output.
print(x + np.reshape(w, (2, 1)))

# Multiply a matrix by a constant:
# x has shape (2, 3). Numpy treats scalars as arrays of shape ();
# these can be broadcast together to shape (2, 3), producing the
# following array:
# [[ 2  4  6]
#  [ 8 10 12]]
print(x * 2)
广播通常能让代码更简洁、运行更快,应尽量在合适的地方使用。
NumPy 文档
以上简要介绍了 NumPy 的许多重要概念,但并不完整。更多内容请查阅 NumPy 参考文档。
SciPy
NumPy 提供高性能多维数组,以及计算和操作数组的基本工具。SciPy 在此基础上提供了大量处理 NumPy 数组的函数,适用于不同类型的科学与工程计算。
熟悉 SciPy 的最好方式是浏览官方文档。这里重点介绍本课程可能用到的几个部分。
图像操作
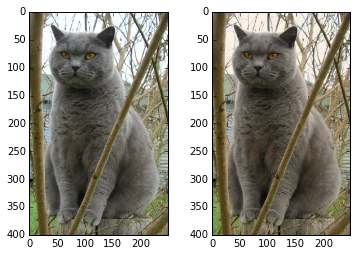
SciPy 提供了一些基本图像处理函数,例如将磁盘中的图像读入 NumPy 数组、将数组保存为图像,以及调整图像尺寸。下面用一个简单示例展示这些功能:
from scipy.misc import imread, imsave, imresize

# Read an JPEG image into a numpy array
img = imread('assets/cat.jpg')
print(img.dtype, img.shape)  # Prints "uint8 (400, 248, 3)"

# We can tint the image by scaling each of the color channels
# by a different scalar constant. The image has shape (400, 248, 3);
# we multiply it by the array [1, 0.95, 0.9] of shape (3,);
# numpy broadcasting means that this leaves the red channel unchanged,
# and multiplies the green and blue channels by 0.95 and 0.9
# respectively.
img_tinted = img * [1, 0.95, 0.9]

# Resize the tinted image to be 300 by 300 pixels.
img_tinted = imresize(img_tinted, (300, 300))

# Write the tinted image back to disk
imsave('assets/cat_tinted.jpg', img_tinted)


MATLAB 文件
scipy.io.loadmat 和 scipy.io.savemat 分别用于读取和写入 MATLAB 文件,详细用法见官方文档。
点之间的距离
SciPy 提供了一些计算点集之间距离的实用函数。
函数 scipy.spatial.distance.pdist 计算给定点集中各对点之间的距离:
import numpy as np
from scipy.spatial.distance import pdist, squareform

# Create the following array where each row is a point in 2D space:
# [[0 1]
#  [1 0]
#  [2 0]]
x = np.array([[0, 1], [1, 0], [2, 0]])
print(x)

# Compute the Euclidean distance between all rows of x.
# d[i, j] is the Euclidean distance between x[i, :] and x[j, :],
# and d is the following array:
# [[ 0.          1.41421356  2.23606798]
#  [ 1.41421356  0.          1.        ]
#  [ 2.23606798  1.          0.        ]]
d = squareform(pdist(x, 'euclidean'))
print(d)
该函数的详细说明见官方文档。
类似地,scipy.spatial.distance.cdist 计算两个点集中跨点集的各对点之间的距离,详见官方文档。
Matplotlib
Matplotlib 是一个绘图库。本节简要介绍 matplotlib.pyplot 模块,它提供了类似 MATLAB 的绘图功能。
绘图
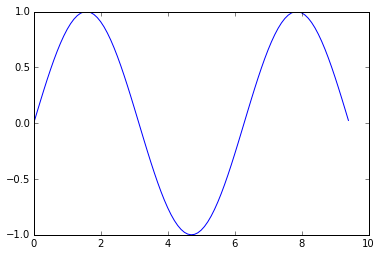
Matplotlib 中最重要的函数是 plot,用于绘制二维数据。下面是一个简单示例:
import numpy as np
import matplotlib.pyplot as plt

# Compute the x and y coordinates for points on a sine curve
x = np.arange(0, 3 * np.pi, 0.1)
y = np.sin(x)

# Plot the points using matplotlib
plt.plot(x, y)
plt.show()  # You must call plt.show() to make graphics appear.
运行代码后会得到下图:
只需增加少量代码,就可以同时绘制多条曲线,并添加标题、图例和坐标轴标签:
import numpy as np
import matplotlib.pyplot as plt

# Compute the x and y coordinates for points on sine and cosine curves
x = np.arange(0, 3 * np.pi, 0.1)
y_sin = np.sin(x)
y_cos = np.cos(x)

# Plot the points using matplotlib
plt.plot(x, y_sin)
plt.plot(x, y_cos)
plt.xlabel('x axis label')
plt.ylabel('y axis label')
plt.title('Sine and Cosine')
plt.legend(['Sine', 'Cosine'])
plt.show()
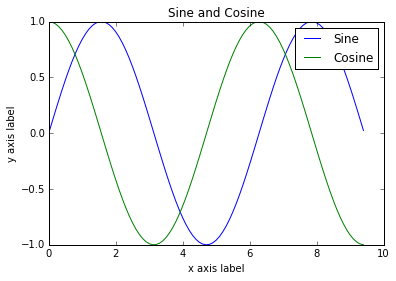
plot 函数的更多用法见官方文档。
子图
使用 subplot 可以在同一张画布中绘制不同的子图。例如:
import numpy as np
import matplotlib.pyplot as plt

# Compute the x and y coordinates for points on sine and cosine curves
x = np.arange(0, 3 * np.pi, 0.1)
y_sin = np.sin(x)
y_cos = np.cos(x)

# Set up a subplot grid that has height 2 and width 1,
# and set the first such subplot as active.
plt.subplot(2, 1, 1)

# Make the first plot
plt.plot(x, y_sin)
plt.title('Sine')

# Set the second subplot as active, and make the second plot.
plt.subplot(2, 1, 2)
plt.plot(x, y_cos)
plt.title('Cosine')

# Show the figure.
plt.show()
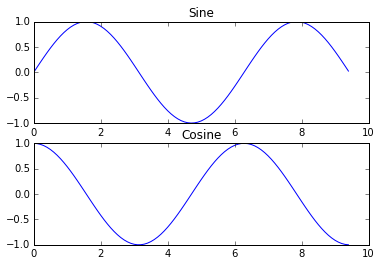
subplot 函数的更多用法见官方文档。
图像显示
使用 imshow 函数可以显示图像。例如:
import numpy as np
from scipy.misc import imread, imresize
import matplotlib.pyplot as plt

img = imread('assets/cat.jpg')
img_tinted = img * [1, 0.95, 0.9]

# Show the original image
plt.subplot(1, 2, 1)
plt.imshow(img)

# Show the tinted image
plt.subplot(1, 2, 2)

# A slight gotcha with imshow is that it might give strange results
# if presented with data that is not uint8. To work around this, we
# explicitly cast the image to uint8 before displaying it.
plt.imshow(np.uint8(img_tinted))
plt.show()